Wednesday, December 30, 2015

YiR: Thank you 2015

I was once told that successful people review their progress regularly to gauge where they are, relative to their goals. I did a mid-year review in June and reviewed the goals I set at the start of the year. I make annual resolutions and goals but those goals move and adjust as the year progresses and I incorporate new ones as time passes, so I don't forget things and continuously improve. Well, that's the intent anyway.

If you've got some time this holiday season, join me in reviewing your year and seeing how things went (or didn't go)...

PERSONAL

A lot of things have shifted for me, personally. There are things I set out for myself that didn't come into fruition simply because I was pre-occupied. But that all said, the major decision of quitting my corporate job and trying to find myself and figure out what I wanted to do was a life-changing event that still leaves me wondering some days, if I'm going down the right path or if I'm being selfish (or stupid) for even seeking out such a far reaching dream. At the crux of the matter though, I feel like I have to make choices for me and nobody else and be okay with the various potential outcomes, including those which might not be as I envisioned them in my head.

Acceptance of whatever I'm dealt

BUCKINGHAM/STANLEY C. PANTHER

These boys are a big part of my life and if you know me in person, you know how important my boys are, to me. Nobody spends as much time as I do, training and caring for two household cats as I do. My main focus is desensitization and clicker training. I do lots and expose them to plenty so that they can be prepared for anything that comes our way. Our neighbours already think that these two are a total hoot running and chasing one another in the backyard and climbing trees but they probably think I'm even stranger! But no matter, I am doing this for their benefit, not mine.

I haven't gotten around to posting any holiday sweater photos of these two

RIDING

This side of my life has been progressing well considering I ride 1-2 times a week and generally spend a lot of time sitting at a table/desk. I've started riding a fancy-pants sport horse and I'm jumping courses. I didn't think would be progressing so successfully in this realm. If I could now refocus all this success and energy onto other areas...
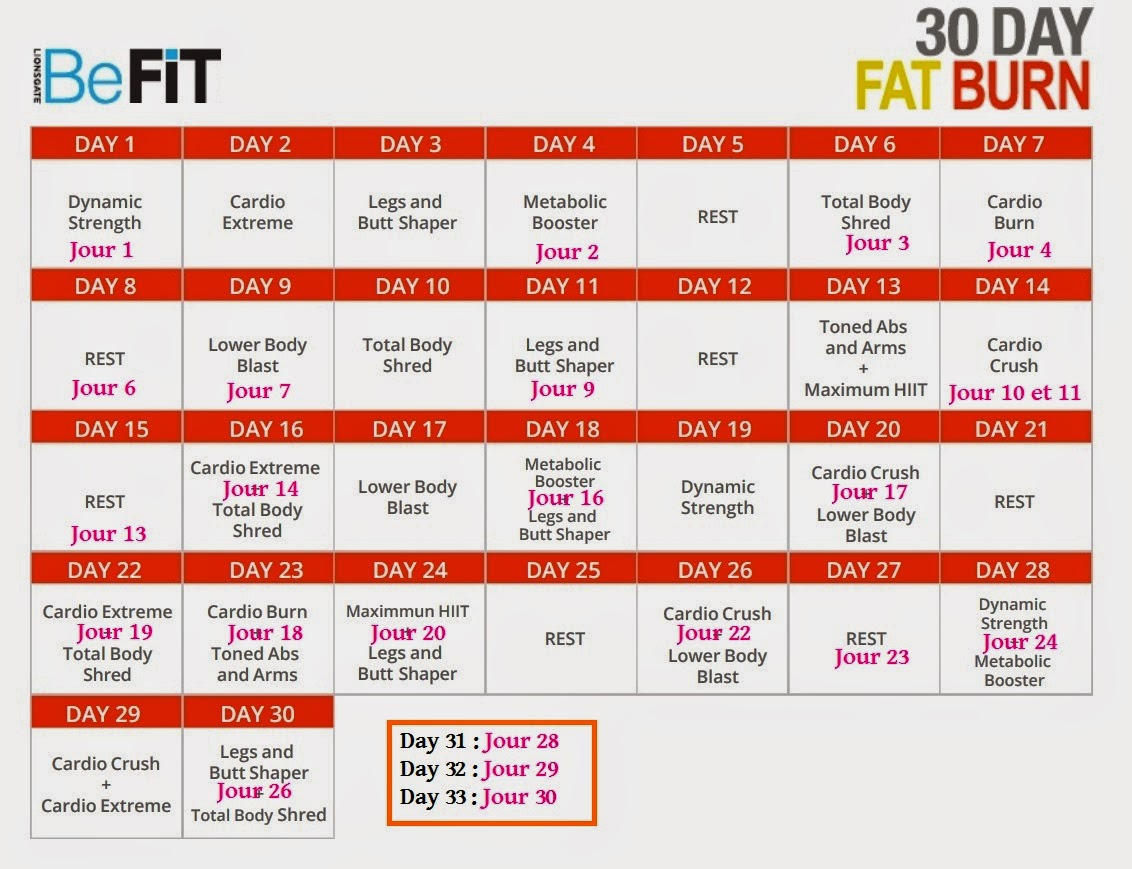


READING

Okay. Let's not beat around the bush here. I totally flopped this year with reading. And I don't really have any proper or legitimate excuse. I will be reviewing my listing and my availabilities in the new year to see what's actually feasible and set up appropriate attainable goals.

I was over-confident

As usual, I continue to struggle with the goals I set out for myself while having some limited success. It's totally a learning experience all the time and while I wasn't nearly as successful the first time I reviewed my goals, I feel that despite the challenges of 2015, I have come out rather well and am looking forward to improving my stats for 2016!

Monday, December 14, 2015

Recipe: Fruit Crumble by Crock-pot

We've had a lot of dinners and potlucks to go to this year. It's no surprise that for the latest potluck (a very happy birthday to our awesome coach, Sheri!!!), we found a really simple recipe that asks for very accessible ingredients and is really straight forward to make--well, almost.

INGREDIENTS
FRUIT BOTTOM:
  • 6-8 apples or pears (6 cups or so)
  • Lemon juice
  • 1 cup dried fruit like raisins or cranberries
  • 1 tsp vanilla extract
(here's where I start mixing things up Deb-style)
  • 1/4 tsp ground cinnamon*
  • 1/8 tsp ground cloves
  • 1/8 tsp nutmeg
  • 2 pinches ground ginger
  • dash of allspice
  • Handful of chopped walnuts (or another nut like pecan)

CRUMBLE TOP:
  • 1/2 cup all-purpose flour
  • 1/2 cup brown sugar
  • 1/2 cup butter
(again, I start mixing things up a bit here)
  • 1/4 cup rolled oats (quick cooking), plus an extra sprinkle more of oats for good measure
  • 1/8 cup rolled rye
  • 1/8 cup rolled spelt
  • 1/4 tsp ground cinnamon*
  • 1/8 tsp ground cloves
  • 1/8 tsp nutmeg
  • 2 pinches ground ginger
  • dash of allspice
*if you only have cinnamon, that's fine. It's the bare minimum spice the original recipe calls for


EQUIPMENT
  1. Slow-cooker/crockpot
  2. Large mixing bowl (crumble)
  3. Paring knife
  4. Peeler
  5. Cutting board
  6. 2 butter knives or pastry cutter

I took the base recipe from here, and revised it since it's more cooking than baking so I don't have to be as accurate! We made the dish twice; once with pears and the most recent, with apples. I have little experience cooking/baking with fruit, so for the pears, I picked two types: a brown (not Bosc) and a green anjou (I think). With apples, I did a quick search and saw that the more tart/sour apples are best for cooking/desserts; I selected granny smith and macintosh.

Red and green for the season

We peeled the fruit in advance; I did a rough peel because I am a big advocate for eating as much of the food as possible to ensure you get all the micronutrients--which are often found just under the skin. I sprinkled lemon juice over the cut fruit and lightly tossed and put away in the fridge until I was ready to start. The original recipe asks for 6 cups of fruit but does it really matter? As long as I covered the bottom of the crock pot by half, I figured I was good. Then, I added the raisins and spices.

Delicious fruit bottom

Next, mix the fruit until the spices evenly coat the apples and add a sprinkle of raisins on top along with the walnuts; otherwise the small nuts and fruits end up only on the bottom of the mix.

Fruit 'n nuts

Plug your crock pot in and turn it on to a high setting for 30 minutes. Go on to make the crumbly top, by combining all the dry ingredients throughly by ensuring the brown sugar clumps are broken and then cutting the butter into the dry mix.

Cut in that cold butter!

Disclaimer: we had no idea how to "cut in butter" and did it totally wrong and should have checked before attempting it based on our own understanding of what it meant. All I knew was that the butter should be small (how small? I dunno!) pieces in the mix but what exact that looked like... I hadn't the foggiest. And of course +ADW has limited experience with baking so knew less than I did. But both of us were too stubborn to look it up. Combined, we created a melty-greasy-doughy mass. Don't let this happen to you and ensure the butter stays nice and cold and rest it in the freezer/fridge if needed. That said though, our mess didn't ruin things.

Not too bad considering we got it wrong...

When the mix is "crumbly", evenly spread over the fruit in the crock pot and spread a tea towel under the lid to catch the moisture. Slow cook on "low" for 3 hours more, or until the fruit is tender. If you are in a rush and only get in 2 hours, fret not! Bring it with you and continue cooking at your destination and leave it on "warm" when it's done. If you're serving right when it's done, wait 10 minutes and let everything "stand".

Delicious and ready!

The best part? Service warm with vanilla ice cream.

Friday, December 4, 2015

To Boldly Go...

The last few months saw a couple of big changes in my life that have really challenged my personal sense of security. The biggest one was when I decided to quit my corporate-y job in June. I used to really enjoy what I was doing, who I was working with/for and what sorts of change I was making. But somewhere, that stopped and I started resenting my job and who it was making me become and I forgot why I was doing the things I was and where I was going. I couldn't see myself continue on the path I was on yet feared to make the most drastic change. I thought things might just get better if I stuck it out long enough but that isn't always the case and I needed to know when to cut my losses.

Only when he no longer knows what he is doing does the painter do good things--Edgar Degas
I have become the painter

The decision to leave my job was not taken lightly because I was really concerned about what my family would think and react. I have spent my life living in my younger brother's overachieving shadow and always trying to catch up with what everyone else wanted me to do (often unsuccessfully) so I often have not been too sure of myself. To my surprise, everyone was really supportive and this gave me the chance to explore what sorts of things actually bring a smile to my face and get me excited to get up for work in the dark and cold winters. I concluded a few things ranging from my penchant for efficient processes, desire to continue learning and love of animals and nature.


You are the captain of your own ship; don't let anyone else take the wheel--Michael Josephson
Make it so!

I have since landed myself in a small animal veterinary practice doing many things ranging from animal care/handling, to client consultation and clinic maintenance. I wasn't sure how things would go since I haven't done any of this work for many years and the business component was something I learned mostly by experience running a community dragon boat club and from my tenure in the corporate world; but none of it was due to schooling or formal training. It could have been an absolute failure but it's been the some of the most fulfilling experiences to date and I am actually excited about going and dealing with the less shining moments and individuals.

As +ADW points out to me, a career is a journey of phases that aim to get you closer to your goal. The goal might not be a specific position (or it could be), and the journey might have some dark and unappealing sections but one just need to keep that goal in mind and take each day as another step forward. The job is just the first step in my phase to moving forward and I am really excited about the upcoming phases that will bring me back to my academic life and seeing where things will take me in the next few years!

Wednesday, November 25, 2015

Next Challenge: Bons

I typically don't wait so long after lessons because don't remember details of what took place! The biggest change is that Ariel is out of commission for me, after it was noticed that she's jumping a little "flat"/long and she seems to be just a bit "off". She's sound and that isn't so much the issue but it looks like she's a little sore or just plain cranky since she's become quite in demand! That said though, we change things up and I am given a choice of Bonspiel or Molson. Both move similarly in that they get heavy on the forehand and require a bunch of face contact--totally unlike Ariel who is mostly uphill and wants you to leave her face alone.

That's not the most intimidating part: the fact that both are 2 hh'r than Ariel proves to be an intimidating feature for me. The first ride was terrifying for me. I was literally shaking in my booties when I went to get Bons (who is closer to 1200lbs+) in the paddock and bring him in. Tacking up was also a feat because the last time I attempted it, the saddle was placed on his kidneys. *womp womp womp*

The first lesson with Bons was all about just getting a feel for his movement and the way he communicates with his rider. He's changed a lot since I last rode him--he's more confident in himself and he's become (to me) less bouncy. I don't find his gait nearly as floaty and big as I have in the past. The sitting trot is still really tough to ride but I manage much better.

As lessons pass, I become much more confident with learning to ride his movement and anticipating his short-comings like his difficulty on the right rein. Riding a larger horse who is impeccably trained since he was a baby is a real treat because he has exact buttons but at the same time, he may or may not read between the lines and take a gander at what I might want of them at the time.

Quite a few lessons have passed since I started riding Bonspiel and I'll be sticking with him for now. Both Sheri and J have told me that the match is good and I will likely learn much more riding Bons than sticking it out with Ariel unless I can tame that 'tude. Bons requires more contact in the reins and is a fancy pants sport-horse so I would effectively be "moving forwards" into a new challenge that would continue to challenge my riding.

Friday, November 13, 2015

A Royal Welcome For a Fellow Rider

The Royal Agricultural Winter Fair is the best of the country being brought into the city for competition and marketing. A prestigious affair, the Royal Horse show is a major highlight for many equestrians and getting to compete at the Royal is an honour. The fair manages to showcase every aspect of agriculture and equestrian greatness. It's a great educational experience for city kids who don't have the opportunity to join 4-H clubs through showcasing their country cousins' pass times and projects.

Gosling Stables is a versatile, down to earth and dedicated place to ride at and I am so happy to be a part of the 'barn family'. I am so pleased to share the news that one of the young riders who trains there qualified with her rescue pony, to ride at the Hyde Moffat clinic being held at the Royal today! Kaitlin is a talented and hardworking rider who has been a regular presence at the stable and we're so happy to wish her the best of luck today.

Monday, November 9, 2015

Lesson #214, 215, 216: Gridwork After an Updated Perspective

Lately, I have less time than lately: I have a new job, hooray! In an effort to keep records for myself, all I can really remember from these three lessons is that I was working on jumping position through gridwork. I'm not sure if I'm the only one out there but I *heart* gridwork tonnes.

Gridwork is a progressive training system that uses poles and fences set at 
pre-determined distances. It teaches a horse to be athletic, accurate, quick thinking and confident; while improving their rhythm, balance, reactions, style and technique. Equally, it helps riders with their confidence, sense of rhythm, balance and distances. Sometimes it's easy to forget about good technique when you start doing courses--especially if you have some bad habits that you're trying to keep in check.

The various grids set up were all fences of varying distances and heights. No oxers or anything out of my comfort zone since I was focused on position riding into, over and out of jumps. The grids were simply set up on a straight line so there was no need to consider corners either! All we were thinking about was the ride in and the position over jumps. Ariel and I did pretty well and I was pleased with the way things turned out because I didn't have to concern myself about the turns and I was just focused on getting through a series of jumps and not a full course.

Again, pretty straight forward but I definitely have a different perspective following my lesson with A.

Friday, October 9, 2015

Lesson #213: Some Nitty Gritty to Get Excited About

The best instructors are forever students and want to keep learning by keeping people around them, whom they can learn from. On Tuesday, I had the opportunity to take a lesson from my instructor's coach!! *swoon* I wasn't sure if I should since it's considerably more expensive but I justified it as a "special lesson" and that I could use it to learn more about my situation and take the information and address what's keeping me behind.

I'll be referring to him as "A" and give you an idea of how awesome-sauce he is. First thing, he's German trained and has been riding since he was a kid and was vaulting by the time he was 10--if you can do a handstand on a cantering horse... I'd say you're pretty darn good. He has a centred calmness about him so when you meet him for the first time, you're not shaking in your breeches. He also relates to his students through appropriate illustrations on what he is trying to say, so they understand. And for someone like me, his technicality and sheer focus to the lesson tasks just draws me in even more.

We start the lesson with me puttering around doing what I would normally do, so he could get an idea of how I ride, where I am etc. Sheri and J told him that I am trying to sort out my inflexible hips/back and uneven seat. Because we all know, everything comes from the seat ;)

"A", on the walk
"A" immediately gets me back to basics... when Ariel and I walk, I should be swinging my legs, in tandem with her rib cage. Legs don't just dangle there. We work on this throughout the lesson any chance we walk. I am also asked to keep at least 1 metre off the rail... this is to ensure I have Ariel's attention because it doesn't give her the chance to lean on the rail--in short, we're doing what I want us to do. I try to stay straight too... yea, good luck. Ugh.

"A", on the trot
The trot isn't so bad except as the speed increases, so does the difficulty with keeping straight. "A" reminds me that I should be using my seat, not my hands: "Ariel stepped beneath you, to stay balanced. Can you feel that?," he says. For the first time, I notice that because I'm actually looking for it. In short, it's how you use your weight in your seat that is what "seat" is all about. I am asked to take my feet out of the stirrups and trot. Immediately, both seat bones drop and now my job is to get my pubic bone properly balanced too. The three points of our "seat" is what we are balancing on and the stirrups are not meant to act as a balance point (while on the flat anyway). "A" gets technically anatomical and tells me that the horse's 14th vertebrae is where our seat should be aiming to connect, or as close as possible.

I am reminded how unusual this sport is, compared to others where the participant is getting 'traction' through their feet. Here, riders 'contact' (for the lack of a better word) through their seat and their feet are not meant to do much of anything--"A" reinforces this concept when he asks me how much pressure should be placed in the stirrup: practically nothing! Even though we are asked to drop the weight through our heels, we are not meant to use our feet as balancing points even though our brains tell us that when something is beneath us, we balance there. Phew. Overwhelmed yet? When I put my feet back into the stirrups, I am attentive about not putting much weight... and I feel the support coming from my lower legs!

"A", on the importance of correct posture
My posture is one of my biggest issues and "A" asks me to sit and "hold two pizzas, one in each hand to the side". Immediately my posture is fixed and I sit back appropriately and my chest is open. Now, without changing anything else, grab your reins. HA! I'm also reminded that if Ariel disappeared from underneath me, where might I want to land... not on my backside, that's for sure! So make sure your legs are where they need to be.

I didn't get a lot of time to work on the canter but where I did, I was reminded of the same things we talked about above. Easier said than done! Sheesh. Perhaps next time I"ll have the chance to do more at the canter.

"A", on Ariel and Deb
Imbalances in rider or horse are common. It's based on habits that we develop and we unknowingly strengthen (or loosen) something we're not intending. Hence we each have a dominant/strong side that tends to take over. It shows up in riding when two beings who have different imbalances try to coordinate with one another, physically.

Horses are inherently good and do their best to please their rider. That means that as moody as Ariel can be, it's on me to set her up for success. Otherwise there isn't anyone to blame for failures or struggles except me. Mare did fantastic despite everything!

In the end... there isn't a lot of "new" stuff that I wasn't somehow aware of at some point but rather, a way of refining what I have been taught, and a different way to look at these things. I hope that if you ride, that this little review might have been helpful to get you thinking about some of the things that you might be struggling with. And if not, hopefully this has given you a more in depth look at what it takes to get just the basics right.

Wednesday, October 7, 2015

Thanksgiving Mash-up Recipe

I spent the summer getting and eating the lovely greens of the garden and now is the time when we start seeing the robust root vegetables and squash. As the weather cools, I'm reminded of the Thanksgiving dinners my mom put together for us as kids. One of the most memorable dishes she makes is a butternut squash mash. To this day, Thanksgiving dinners aren't quite complete without it and this is the first year I'm having to do these types of things on my own. I thought to share the recipe!

These are not exact measurements and it's more about putting together proportions of the ingredients you enjoy.

INGREDIENTS
  1. 1 small/medium butternut squash
  2. 4-6 carrots
  3. 5-7 small red potatoes (or other potato)
  4. 1 white small/medium onion
  5. 1-2 cloves of garlic
  6. 1/4 cup unsalted butter
  7. 150g cheddar cheese
  8. Salt to taste
  9. Black pepper to taste
  10. Granulated garlic powder (1/2 tsp or to taste)
  11. Ginger powder (1/4 tsp or to taste)
  12. Nutmeg (1/4 tsp or to taste)
DIRECTIONS
Haul from the farmers' market
1. Gather the fresh ingredients and start cleaning them of dirt and blemishes/eyes/etc and peeling the carrots and potatoes. Note: I chose not to peel the potatoes unless there is a blemish or eye so I could keep the fibre-y bits. Keep in mind that often the best nutrients are found in or just beneath the skins so you won't want to let those go to waste (and it's good for your colon)! You'll also need a large (~6 quart) crockpot, water and your stove.

Cutting the squash can be precarious so be careful!
2. The tricky part will be to get your butternut squash peeled, opened and cleaned. Tip: I laid it on its side with the 'bulb' in my weaker hand and sliced off the stem. Then I inserted the tip of the knife into the columnar portion of the squash, lengthwise, and pushed the knife down towards the top. Once the cut is made (doesn't have to be all the way through), I pull the knife out and stand the squash upright and then take the knife and drop it into the cut and bring the knife right down to the 'bulb' and am able to slide it right open. From there, the peeler has a "grip" where I cut the stem off and I peel from top down.

Carrots, garlic, potatoes and onion
3. Then I cut everything into smaller pieces for quicker cooking and easier mashing. Note that carrots generally take the longest to cook so I cut smaller pieces and the onion cooks the fastest. At this time, I have not yet cut the butternut squash because that cooks the fastest.
Boiling phase 1

4. Add the ingredients to the crockpot and add water just until it starts covering the ingredients. Cover the crockpot and turn it on high heat to get boiling.

During this time, get the butternut squash ready by cutting it into smaller pieces to be cooked.

Cook on medium-high for ~10-15 minutes or until you can push a fork into the potato and carrot with resistance.

5. Add the butternut squash pieces and add some more water to the point where the water is halfway up the squash layer.

6. Boil for about 10-15 minutes more or until the fork easily slides into the butternut squash. At this point, you're ready to drain the pot and you can either chose to keep the broth for something else (it's great to drink if you've got a cold as its full of vitamin C and other water soluble vitamins/minerals) or dump it.

7. Grab your fork or potato masher and add in the butter and cheese. Slice the cheese into pieces so for easier melting. Mash vigourously. Include the salt, pepper and other spices as you are tiring out and mix well. Tip: if you aren't sure about the spices, take a small portion out into a bowl and play with the proportions there to see what you like. My proportions are for a full pot based on me fiddling around with a recent batch but your tastes and portions will be different than mine.

I got so excited to taste and run out the door with it (I was taking it to a pot-luck), I didn't get an image but the image doesn't do much justice to how it tastes so nothing lost there. But if you're looking to get some colour into your diet and mix things up for Thanksgiving, check this out and make it in place of your mashed potatoes!

Let me know if you get a chance to include it in your Thanksgiving menu this year and how you enjoyed it!

Monday, October 5, 2015

Lessons # 210, 211, 212: More Doldrum...

As I mentioned in the last lessons post, nothing noteworthy has been happening and so I haven't found the motivation to post anything. I continue to work on the same things as position and whatnot, over jumps but nothing significant has come out of it so far. I continue to consider the things I am not doing right:

  • I'm too handsy when I should be using seat and leg aids
  • I am stubborn about using spurs or the crop/bat
  • I find myself tending to one seatbone sometimes
  • I don't open my chest up enough in corners and don't actually turn my shoulders--hence part of the counter-bending
The only interesting thing has come out of the lessons lately is that I had the opportunity to ride the last 10 minutes or so of a lesson, on Sheri's fancy pants dressage horse, Blue. He's humongous and has so many of those "fancy buttons" like leg yielding at a touch. Riding his strides is like learning all over again b/c if I thought Bons was floaty, this guy is even more so. Certainly, we saw a lot of the issues I've been having, manifesting very clearly while on Blue because he's just SO responsive.

Hopefully if I just am continually diligent about the exercise, I'll see some improvement.

Friday, September 25, 2015

Waste Not

There is a great deal of waste taking place in kitchens and groceries stores across this country.

Oh the horror! Especially for a foodie like me...

When we get produce from a grocery store, the produce is cleaned and tidied for the consumer so we don't always get the produce in its complete form--totally understandable. But I started thinking about Korean dishes that fellow blogger Maangchi shared with the world, and wondered: which tops are actually edible?

I grew carrots and beets in my backyard a couple years ago and observed that for a single root (what we generally consider the edible part of the plant) there is a lot of foliage going on, on top. Quick general science background in case you're not familiar with root/tuber plants: these plants produce lots of foliage during the growing season because the leaves are where food production takes place (plants grow their own food!) and as fall rolls around, they take all that food and store it in the root/tuber for the next season. Roots/tuber vegetables generally have more starch than their leafy or fruit/flower components.

The thing is, most people send the green (and red) tops of beets, carrots and radishes to their compost/garbage bins when in fact, they're tossing away an edible (unless you have allergies) leafy green! These young leafy greens are great additions to a salad with their peppery tasting leaves giving a little bit of pizzaz.

Photo credit: Todd & Diane

However, it is logical that it is off-putting when considering residual pesticides or other chemical additives that might linger so in that case, certainly toss it away. But if you have the chance to get organic or pesticide free leaves and tuber/roots, cut the leaves off when you get home and store each piece separately.

I didn't have the same patience to make the recipe that Maangchi posted but I decided to stir-fry it with garlic and salt....


Washing them in cold water to prep for cooking.
Don't forget to cut into halves of you'll just have one long leaf to eat!

  1. Clean up the leaves in cold water; halve the leaves so they're not one long piece to eat
  2. Shake off the excess water
  3. Mince garlic and set aside.
  4. Add some oil to a hot pan, waiting a minute for it to heat. You'll know it's hot enough when you tilt the pan around and the oil becomes more viscous.
  5. Added garlic to let that sizzle and cook a bit--careful not to let it burn so stir gently.
  6. Then drop in the green tops of radish and cook and stir/turn until wilted and dark green.
  7. If it gets too dry, add a tablespoon or splash of water--not too much or you'll have watery vegetables.
  8. Add a pinch or two of salt to bring out the flavour and voila!


Hello tasty!

It's my first time having them so here's my verdict... they're really tasty and quick to make! They are tougher than spinach and taste a little bitter (but I love bitter melon--those who don't know... you're in for a treat ha ha!) but still taste great.

Maybe you might have the opportunity to try this recipe or check online for other ways to use this wonderful forgotten gem!!

Tuesday, September 22, 2015

Lesson #208 & #209: Frustrated Enough to Motivate

I haven't written about the last two lessons because nothing has really progressed and there hasn't been any "a-ha" moments either. I am working on jumping courses again but I'm finding myself struggling with my position over jumps, again. While it isn't a big deal... I've been doing courses at a lower height so I feel like I've regressed a bit. It's more injury to the ego than actual regression so I'll take it... for now.

I have been anticipating the jumps recently and I notice that's what's keeping me behind and a poor position. I suspect it's got to do with Ariel's recent stint of counter bending and giving me way more trouble in the arena than I'd like. I haven't let it escalate and she hasn't dragged me out of the arena on her whim, but I'd still like to get that respect back. As well, I seem to have trouble keeping our corners deep. This causes a poor set up usually and it is yet another cause to the issue over fences.

The flat work is mostly fine (it can always be better) but I have had trouble getting Ariel to respect my aids. I might have to resort to crops/bats and spurs again... which I don't really enjoy using but if Ariel is getting a bit sour with poor communication from her rider, I wouldn't be surprised if that's the reasons she's reacting the way she is. I don't blame her either... having clarity during a conversation about what to do is awfully important in my books.

As with all things to do with riding, it starts with the rider and I have been talking my mouth off on this area periodically for some time. I make excuses all the time but in order to get over my rut (both in riding and other areas), I will incorporate a balanced schedule and include other physical activities. Upon further reflection and not enough research, I started the BeFit's 30 Day Fat Burn workout that ScarletPen28 has done. Each video is approximately 10 minutes.

Click to enlarge

Scarlet did this one and another combined; she's crazy. I can only manage this one right now... after doing day 1, I still can't feel my legs and part of my arse. I'm not sure whether to love or hate her for finding this thing. Tonight, I attempt the Cardio Extreme workout. If you don't see another post in the next few days, know that I probably didn't survive that video (10 minutes!! :O) and that +ADW found me curled up in the fetal position in the basement.

Wednesday, September 16, 2015

A Review: Tredstep Ireland; Deluxe Half Chap (brown leather)

When I started riding, I did as most parents do with their kids and didn't spend a lot of money on most of the equipment needed. I wasn't sure how long I'd be riding and wanted to be certain I was fully committed to a rather expensive sport. I did splurge a bit with my first pair of half chaps because they were on sale, hoping that they would last a long time... and got the leather half chaps from Greenhawk. I used these for ~3 years before they finally gave way. +Laura does a thorough review of the same half chaps in 2012 and we both ended up with the same issue where the zipper gave out before the actual body of the half chap.

I have brown paddock boots and interestingly, while I was looking for them, it seems like brown is out now so I had difficulty locating brown half chaps. I settled on Tredstep.

Mine are in brown but brown is apparently out of style!??

What drew me to these ones were that they are a soft durable full-grain leather that is easy to clean. I only school so I have no need to get fancy but I do want to look presentable during lessons and an easy clean means that I can do that without different cremes or whatnot. I wipe clean with a damp cloth and then I'm on my way.

While shopping for these, I found that Tredstep carries a very wide range of sizing as you need to size the widest part of your calf as well as the length of your lower leg--I am short and wide-ish. In addition to the range of sizing available, the back panel of the chap is stretchy and conforms to the leg comfortably and quickly. This meant minimum break in time after I bought them as tight as humanly possible while still being able to zip them. The two snaps: top and bottom also meant that the chaps stay in place snugly while I'm moving.

And of course, the best feature is the zipper. It's practically industrial grade and I don't worry about the zipper coming apart or the tag breaking. Though, in time, I'll be able to make the best assessment of that! For now, this chap has exceeded my expectations and they also look great. They are expensive, relative to what I had, but when compared to the other brands I checked out, a full-grain leather half chap is around this price range.

I'd say that these are great for adult riders like myself who are serious about riding long term (aren't showing) and are looking for a sleek looking half chap that is built to last.

Disclaimer: I wasn't solicited by either the tack store or Tredstep to review this half chap. I bought it after reviewing some of the others out there and decided upon this pair and this post is simply my opinion based on experience.

Monday, September 14, 2015

Lessons #205, #206, #207: Reinvigorating Goals and Direction

There isn't much to write about with the last few lessons other then I've been working on addressing the right side issue that we discovered 2 weeks back. I try to ride with my right hip relaxes and the leg "falling outwards" so I can keep that in check. It seems that once that hip pulls my right leg in, the rest of my right side follows and that's where the curling inwards comes from. So my lessons are mostly me making the conscious effort to go through the check list at all gaits:

  1. Weight in the heels/heels down
  2. Right hip open and relaxed so the thigh is off the saddle
  3. Hips and lower back relaxed to absorb the movement
  4. Chest open and shoulders back and 'down'
  5. Looking in the direction I am turning, even for corners
  6. Shoulders following my head turn
  7. Sitting back/up
Things are coming together more as I am making the conscious effort to ensure that the hip doesn't allow my right leg to collapse. It's really easy to get handsy in the corners instead of using my seat to push Ariel back out and on the right bend.

On Thursday, there were 2 other students in my class and one of them is still working up to getting comfortable with things so it was a good opportunity to focus on flat work. I felt ambitious (though to be honest, I did tell myself I needed to use the time more efficiently) and started weaving in and out of the bending poles that were just standards set in a line. This exercise is difficult even at the walk because you want to use your seat to turn them and not your hands/reins. 

The warm-up consisted of a series of different tasks that for some reason, I felt very comfortable flowing from one to the next...
  • Posting trot with and without stirrups
  • Sitting trot with and without stirrups
  • Adding 2 point position
  • Cantering with and without stirrups
  • Cantering in a 2 point position
  • I even managed to sort myself out to pick up and drop stirrups during canter! A feat that usually leaves me tight and bouncy
On Sunday, I had +ADW pick what we'd do since I usually get to pick on Thursday nights already and I wasn't feeling particularly nervous about anything. I'm glad the picked an over fences lesson because I had done quite a few flat classes recently. We did things pretty low key and kept the jumps low so to get a better feel of the horses' movement over jumps. The lesson went quite well in that we were jumping the course and ended on the highest jump that was set out there at around 2'3" to 2'6". It wasn't pretty which simply means I need to continue working up on the things that I am doing at the lower heights so I am more solid.

Areas of improvement include, but are not limited to:
  • Sitting back up between jumps
  • Shift our hips back instead of jumping with the horse, over jumps
  • Using the space in the arena better so we can appropriately set ourselves up for the jumps
  • Looking early for the jump
  • Drive with our butts coming into the jump
Hopefully I'll be as diligent with my most recent lessons, for the coming ones so I can continue to improve upon the things I lack. In addition, I am going to be starting ScarletPen's 30 day bottom challenge to address a possible weak backside and start getting in a 45-60 minute yoga session 2-3 times a week. And now that the weather is cooled down, it might not be a bad idea to jump on my bike...

Friday, September 4, 2015

Lesson #204: Quasimodo

The traffic I deal with on week nights really makes me question why I go up in the evenings... especially since right now, I don't work. It took me 30 minutes more than usual, to get up last night. I left early with the hopes that I would have some time to mosey on in. I was SO WRONG. I was even late this time and had to run out into the rain to get a sopping wet Ariel from her paddock and quickly tack up.

Another new student joins the class today. This girl looks to be in her teens and she's returning to lessons after taking time away from riding. That said, I figure it's going to be a pretty low key lesson so I can work on my canter transitions.

After a varying warm-up of posting trot, sitting trot with and without stirrups, I am directed into the canter. The other girl seems to pick it right back up and has no problems at all. I, on the other hand, am struggling with keeping Ariel out at the rail on the right rein and she's falling in and the corners are just plain ol' botched up. I am certain that it has to do with me because as is most of the time, it's a poor rider that gives poor results. Especially with a horse like Ariel who is not particularly forgiving about miscommunication from the rider. While Ariel knows her job and loves to jump (she hates to bend... haha), she demands that her rider is properly clear with her so that she too so that everything flows. After all, the communication means that the rider is giving appropriate physical signals and staying balanced.

It's pointed out I'm using too much rein with the outside one trying to redirect her. Sheri directs me to break down the canter in the arena: trot the long sides and canter going into the corners. Then progressively going into the opposite pattern. The departs and downward transitions are bang on and there is mostly no issues when I'm doing the canter in pieces. It is pointed out to me though, that the cause of the falling in/bad corners is my right side curling in at the corners (I KNOW!!! UGH) and my right leg gripping and coming out of the seat. Seriously, the left side is perfectly fine and that's how my right side should be but isn't. I don't know the cause but I do have to take extra care to keep my chest open and right leg relaxed as much as possible.

I swear I was so frustrated but equally relieved I figured out what the issue is. So now comes the work each and every minute of every single lesson following....

Thursday, September 3, 2015

Lesson #203: Seeing the Curve

Saturday's early morning lesson had me working on more jumping but with +ADW. Similar, to the Thursday lesson but two friends joined to watch the lesson because I'm hoping (fingers crossed!!) that at least one of them would decide to take up lessons too. I'm not normally a particularly social person and I enjoy yoga because I can go at my pace and know that I'm my own competitor, but sometimes do find that riding can be a wee bit lonely. ADW rides with me but let's face it, he isn't as "into it" as I (and some of you!) are. So it's nice when adult students join classes--that's what my current Thursday nights are for!

Anyway, the lesson we do is a jumping lesson with J and we spend less time than recently, on the flat. Ariel has been a bit pokey and one of the things I struggle with is picking up the canter when I ask. Sometimes Ariel flat out refuses to move even though I've told her to; it takes a more severe method of reinforcement in those cases. We get right into the jumping. I take a jump (red) on the diagonal but close to the rail and have trouble 'seeing' the ride-in. I don't ride the corner as deep as I should and sometimes come in at a much more gradual curve which leads me to be more handsy.

Totally not drawn to scale... hahaha...

There is still a struggle to get the ride-in just right but it isn't miserable and so we do move onwards to adding more jumps to the course until I ride all the jumps in the arena. I try my best to sit back up once I get through a jump because I have literally ridden more and more forward as the course goes on and as we all know, getting your centre of gravity forward and up is a great way to set yourself up to land on your face.

I didn't mention yet... that ADW is now cantering multiple jumps too!! He's riding a steady gelding who's a great teacher!

Wednesday, September 2, 2015

Lesson #202: Interspersion

My Thursday class was a jumping lesson in the outdoor sand arena with one of the student's mom who's taking lessons as well. It's her second jumping lesson apparently but honestly, you wouldn't think so.

The start of the lesson has us warming up with the trot and then I move into a sitting trot without stirrups. I still find I have the best balance without stirrups since there's something wrong with my right hip and it tends to collapse at the knee without me consciously thinking about it. I don't know what muscle is causing the issue but it is the biggest issue at this point in time.

Then J says to canter without taking back the stirrups around and around. Ariel and I have a really good lesson. She is responsive and quick without fussing and objecting. To level up this exercise (after taking back the stirrups), we are asked to hold 2 point (jumping) position while placing our outside hand behind the small of our back. The objective is to get our upper body position up and open while our hips go back. This is not too tricky a task which surprises me because I thought I would have difficulty balancing and keeping the turns.

Finally, we move into over fence work. Starting with one is just fine. My position over is mostly good and I don't have major issues. Then we start adding more jumps to create a mini course. One couple of jumps is a line on the diagonal and J reminds me that the middle is flat work and that there is little time to think about much else but to sit up. I have trouble with doing that. For some reason, all my mind can think about is "let's get into a forward position and just hold it". WHY??? Ugh. So I have to really intentionally think about sitting back up in between the jumps. My course work is certainly improving but I have to remember that the flat in between jumps should be ridden as such and "preparing" for all the jumps with a forward position isn't doing me any favours.

Wednesday, August 26, 2015

Lesson #201: Drunkie Pony

Writing this post is exciting for me because this lesson marked a milestone for both +ADW and myself. Ariel and Hank were both showing so I asked to be surprised with our mounts. J brings in two new geldings who recently joined the herd. One belongs to the rider I rode with last lesson and the other is a new pony meant for beginners... I got the pony (*squeeee!* I love ponies!!). Indie is a gentle pudgy sable coloured (that's like a medium brown? I'm not well versed with equine coat colours) pony with a voluminous mane.

It's the first time we got on horses where we know little background. Who knew if they'd be real jerks or spooky and skittish. In addition, without understanding their training, we didn't know what they'd be capable of doing. One of the things discovered so far is that both are wary of the mounting block. I was successful to get Indie to the mounting block so I took that small victory as a win.

First Impressions
Indie is happy with a light hand and he seemed eager to walk forward but appeared tense about having me on his back. He also required little leg and responded as soon as I applied my leg. I was asked to get him off the rail so he wasn't using it as a crutch in place of listening to my directions. Let me tell you... this pony walks like he's drunk!! LOL. He's fine to bend and turn but walk a straight line? GOOD LUCK. Without trying, we ended up doing some hind in, shoulder-fore, leg yields... It was hilarious to watch, I'm sure, but my legs were constantly trying to remind him to walk straight.

Sewing Machine Trot
His trot is bouncy like a sewing machine and he speeds around the arena when I use too much hand. Needless to say, I am a bit of a hot mess up there leaning forward and bouncing on his back trying to sort us out. There are moments of being in sync and I'm told we move well together when it's right. After getting sorted out, we're directed to go over trot poles and I have to man-handle him to stay centred (and not avoiding the entire exercise!) and he even stopped once as if to say "what the heck do you want me to do!?". J said that greenies are generally even more wriggly.

A small X was set up and at the start of the lesson, I really was not feeling so confident about getting over it. Literally, we're talking like maybe 4-6" from the ground and some horses will consider that height an insult to their abilities and will trot over it or plain ol' bowl through it. But, after success with the trot poles, I decide to go for it. I mean with such a small pony, the fall wouldn't be far and we seem to be starting to understand one another. Another win when we both get over a few times with success.

Getting Balanced
Mid-way through the lesson, the other horse starts getting unruly and even J has trouble with him when he hops on, to "win the fight". Indie and I move onto the canter now. With minimal expectations, I tell him to get into a canter and guess what? It's not too shabby either!! It's no Grand Prix Dressage display but the correct lead was picked up (though at times I wasn't too sure, with that much mane covering his shoulder) and we went round a few times. Poor pony is not fit enough to sustain it long so we go half way around and putter out.

Fight Club!
After working on all that, Indie starts defying my asks, pulls at the reins, backing up, shaking his head, stopping and all that fun stuff *sigh*. This might be the most exercise he's gotten and he's starting to protest to the amount of work and you can see he's quite sweaty too. I likened him to the chubby guy who has done for his first work out, despite not wanting to. J tells me that I just need to keep him moving forward at my insistence, regardless of gait. Thanks to Ariel, I'm no stranger to a cranky horse who is trying to take over so the 'fight' ensues... hopping, reverse, refusals... we weren't sure if I'd finish walking the arena!

To reward him for complying for our awesome small victory, I hop off and we walk the arena to cool him off. He's actually a little pushy (needy) and I have to remind him to respect my space and by the end, it's not half bad and he follows me around with his head lowered and I am able to keep my space!!

Sunday, August 23, 2015

Lesson #200: Whips, Crops and Progress

I had a Thursday lesson in the outdoor jumping arena with one of the other youngsters. She just got a new horse (went from bossy mare pony previously) to a new gelding. He's still new so I don't know a lot about him. I pulled Ariel from her paddock and she's covered in mud despite only having been on there for about 30 minutes and wearing a fly sheet. Seriously. After getting right in those nooks and crannies, I saddled her and we went off to the outdoor. For some reason, it was a super busy night (usually it's just me and MAYBE one other) so both indoor and outdoor were being used.

I incorporated bending and circles into the trot warm up but noticed that my right leg tends to hug Ariel too much and she ends up leaning on my leg. During one circle, she leaned so much on my leg that she tripped--not something that typically happens. She's also more pokey and slow than usual probably because she's got a slightly heavier work load with all the kiddies wanting to ride and show her!

The rest of the lesson is mostly just working on the flat at trot and canter and transitions. I have been doing yoga this past week and notice that my balance and whatnot is better and I'm able to initiate the canter transitions more effectively. I suppose it helps that I had a dressage whip too. BTW, I didn't realize that the way to use a dressage whips is different than a crop/bat!

Riders generally know this but for those who read the blog and aren't aware... there is a continuum of severity in communicating with your horse. It's like I was always told to ask, ask louder, demand. I personally prefer not to use one because I find it distracts my position but some days, I need extra help.

Top: dressage whip; below: crop/bat

Crop/Bat: after asking and asking louder, you can demand your request with the bat/crop by angling it towards the shoulder and tapping them with it. And if that doesn't work and you need more go, get that thing behind your leg and give them a good smack with it. Nobody (including horses) like getting hit so they'll likely move forward.

Dressage whip: you hold this piece on your thigh and when you require the "demand", you simply lift it and tap it against your leg because it's flexible enough to 'kiss' their hinds to get them moving. When you're not using it, you want to avoid accidentally tapping them so direction is down a bit, against your thigh. With the dressage whip, your position remains more consistent since you're not moving your arm as much.

Back to the lesson: I tried to maintain the canter without breaking so I have to remember to sit back when I ride and not lean forward. Continuing on the flat work, I am asked to do some leg yield and wow, what a hot mess for both of us!! It isn't a very successful portion of the lesson and I'll need to come back to it another time.

To finish the lesson, I am asked to do some jumping of single jump. The first one I take is a nice low one where the pole is placed on the seat of two patio chairs (so not all that high but a good start). My first try was actually quite successful and I felt good about it. J asked me to move it up a notch and try the two wood crates/boxes that are about 2'6 in height and also a source of anxiety formerly. I am really happy to report that that jump didn't phase me at all and while my position is still a work in progress, I didn't freak out while riding into the jump and my recovery following a poor position was quick.

Wednesday, August 19, 2015

Lesson #199: Flat Work Faults

Our lesson on Saturday saw us get back into jumping. We've been taking it kind of easy lately so it's exciting to get back into jumping. We started the lesson with the usual trot warm up and focus on bending and keeping our corners nice and clean. We also do some exercises with downward transitions where I don't allow Ariel to just fall into the transition down. This is tough because I have to collect Ariel and sometimes it doesn't feel like anything is actually happening or my back starts to seize and I lose that movement with Ariel. I seem to only get that movement when I really concentrate on sitting trot but when I try to initiate anything else, I go from going smoothly with Ariel's movement to bumpity bumpity bump and things start falling apart.

Canter transitions upwards continue to be a struggle because my movement with Ariel contradicts when I try to initiate it and my upper body falls forward and Ariel simply speeds up. It's tricky but I have to get myself to sit back so far that it feels like I'm leaning back. The main initiator is the inside seat-bone but lately I've been having trouble getting that seat-bone in and my outside seat-bone has actually been the one that's unevenly doing what I don't want it to.

Finally, we work on jumping! The jumps set up are around 2'3 to 2'6 and I'm asked to take one at a time at the canter but with the struggles I've had, I have issues getting the canter when I want and I have to circle a few times but that only seems to discombobulate me even more. At the end of the lesson, we determine that my jumping is coming along and that I'm able to get up after the landing, even if it's not very good, quickly but the flat work is where I fall short because let's face it, I can't take that long to pull myself together. In the hunter ring, you have a limited number of tries to recollect yourself before you're disqualified--I think it's once or twice to circle. In the good news department, +ADW has started cantering the jumps too!

Who thought that after all the flat work I've been doing lately hasn't quite translated into my transitions on the flat and being able to get going when I want to. Hopefully I get the opportunity to work on transitions on Thursday night...

Monday, August 17, 2015

Blog Hop: The Liebster Award

I have been nominated for a Liebster Award by a fellow blogger whom I also know in the non-web based world; though, we do talk a lot by instant messenger. Scarletpen28 has nominated me for the Liebster Award which is an award that helps new bloggers (with under 200 followers) connect and promote each other. It also adds a bit of fun, motivation, and encouragement for newbies. It's like a blog hop so here goes!


The Liebster Award Rules

  1. Link back to the person who nominated you
  2. Answer the questions given to you by the nominator
  3. Nominate up to 11 other bloggers with less than 200 followers
  4. Create 11 questions for the nominees
  5. Notify all nominees via social media/blogs

My Answers to Scarletpen28's questions...


If you could be any animal for a day, what would you choose and why?
I love cats and I think they are probably the most hilarious and awesome animals to be around. However, I admit that their lives can be pretty dull if they're house cats. I'd choose an animal that has a very different environment and experience, I'd pick an animal of the sea. I choose a large whale like the blue whale. I could swim all over the oceans and see the world's coasts!

What is your biggest pet peeve?
Where to start... rubber neckers on the road, slow walkers, people who don't poop and scoop, crab grass... I'd pick the city raccoons (there is a family of 6!) that live in our neighbourhood and are climbing my trees, eating my raspberries, pooping in the yard and driving my fur babies bananas at night.

If you could live anywhere in the world, where would you choose and why?
That's a tough decision since I haven't seen all the places of the world. To date, I'd choose to live in Iceland. The simplicity of the land and the amazing natural wonders like the aurora borealis, hot springs, volcanoes, and being so close to nature yet close enough to the city (specifically Reykjavik) is perfect. The weather is also surprisingly tolerable for a Canadian.

What is the bravest thing you’ve ever done?
At this point, quit my comfy office job without knowing exactly what I want to do next.

Why did you start a blog?
I wanted to document and record my adventures.

What is your most impressive hidden talent?
I can't be surprised. I have managed to foil EVERY SINGLE surprise that +ADW has tried to plan for me, including the proposal :D

What is your most prized possession?
As I've gotten older, there aren't really any possessions that I prize above the people and critters in my life.

Describe yourself in 10 words.
This isn't really a question... but I'd describe myself as determined, easy-going, genuine, honest and a little obsessive.

What is the most amazing experience you have ever had?
I want to keep doing amazing things so it's possible I'll out do this one but the most amazing experience at this point is arriving at the Gate of the Sun in Machu Picchu.

When you were 5, what did you want to be when you grew up?
I don't remember what fancy or whim I was entertaining at 5 but I suspect that I wanted to work with animals in some capacity. Most likely I wanted to pursue the veterinary field or I simply wanted to ride horses and keep cats :P

Did you pursue it?
Not the veterinary field part, but the other part? Yea, part- and full-time!

What’s your go-to healthy recipe for a busy weeknight?
I'm not terribly creative and can be INCREDIBLY lazy when I have to eat for myself so I would say I've gone with a green salad with whatever other vegetables I might have on hand and some sardines or other canned fish. I add a simple oil and vinegar dressing with garlic powder (yes, I can't even pull myself together enough to mince fresh garlic) if I'm feeling like it needs an extra kick.


I nominate...


Questions for my nominees:
  1. Why do you blog?
  2. When did you get started with your horseback riding journey?
  3. What is the most challenging thing you find, about horseback riding?
  4. What is your favourite vacation spot/experience?
  5. What is your favourite novel/book and why?

POST SCRIPT: I nominated those who I know for certain have less than 200 followers. If you are reading this and would like to participate anyway, please do and leave a comment that you've done so! I'd love to read what your answers are.

Friday, August 14, 2015

Lesson #198: Winning!

The show season is in full swing and this season, Ariel's been doing amazing! She's placing at every show she's gone to and now all the kiddies want to ride her and take her to their show. Which means I have a somewhat slow and pokey pony some days b/c she'd rather be out in her paddock bossing around the other horses. Despite that, I have been diligent with keeping on top of my game with her and reminding her who's boss because I don't want another "incident" like the last.

We had another flat lesson just putzing around the outdoor going over canter poles and focusing on position and balance and all that fun stuff. I was also determined to not need the crop/bat, again so I was pretty serious with the mare right from the get go, about what we were doing. I admit, I am getting tired of kicking her to get us going when she's ignoring me but sometimes it has to be done.

The sitting trot was pretty good, and it's the first time in a few weeks that Sheri's taught my lesson and she commented that things are looking pretty good! I said that I was pretty determined the last several lessons and focused on the flat quite intensely. My hips are moving the way they should, now... and I'm not bouncing around as much and not leaning forward. But it still requires a conscious effort b/c it's simply easier not to do all that.

Then we get into canter and changed the trot poles into canter poles on the long side. My canter transitions continue to need a lot of work... We are still chasing her into the transition and she's counter flexing. I am SURE it's because of me... but what that is? I have yet to figure out. We do manage to get into the transition eventually but usually with really big mess up there. Then my right foot manages to fall out of the stirrup and so I decide to toss both and just ride it. Sheri asks me if I did so intentionally and I caught a smile crack when I told her that I managed to canter without stirrups a couple lessons ago! She laughed and said that it was pretty good considering I chickened out last time! hehe

Despite being a low key lesson, I found that there was both progress and some consistent struggles. I would hope that we might amp it up next lesson and I'd start doing some more technical things, really focusing on transitions or doing a few jumps to get me back into it.

Thursday, August 13, 2015

What the Heck to Do... part 1

... with all those crab apples!?

When +ADW and I bought this house, we didn't know what we were getting in terms of garden and yard flora. I knew that there are two cherry trees that blossomed in two different colours (spliced with a white branch on a pink tree) but I wasn't entirely certain about what else was on the property. I soon found out that I have a really cute little crab apple tree that is very hard working as far as a tree goes.

In the spring, I saw all these wonderful flowers and thought absolutely nothing other than "awwww look how pretty that tree is!" I'm a biology graduate... I should honestly know better: flowers lead to fruits! DUH. The cute little tree is now over-burdened with pink-purple-red fruits about 1.5 inches. I have no idea what to do with these things!! Ariel enjoys eating them, but isn't allowed to eat too many. My parents (who live across the street--yes, it's an 'Everybody Loves Raymond' thing) like eating them but again, only eat a handful every now and again.

As typical owners of crab apple trees think, what the devil am I going to do with all these apples?? I looked up some recipes to see what I could do... and they range from easy to a pain in the butt. I decided to try the easiest approach, slow roasting these babies with cinnamon.

You'll need the following supplies:

  • Crab apples
  • Oil for high heat
  • Ground cinnamon

Then you follow the directions...
  1. Wash apples and leave stem etc, intact
  2. Lay them in a low walled baking sheet to dry
  3. Pre-heat oven to 300F
  4. Drizzle/coat the apples with an oil good for high heat
  5. Hand mix the apples to coat with oil
  6. Sprinkle ground cinnamon and again, hand mix
  7. Pop them into the oven
  8. Roast for 1.5 hours or until the apples look wrinkly or have split skins. I'd pull one out to test after the 1 hour mark. Also, you'll note that depending on the size of the apples, the time might change.
Unexpected bonus: the entire house just smelled of apples and cinnamon. That lovely aroma alone is reason enough to do this!

Glossy apples ready to jump into the oven!

Sprinkling on the cinnamon

Slow roasted crab apples!

I was chatting with my neighbour and they said I could have them with a pork roast (savoury) or drizzle maple syrup on them and have them like that, or add ice cream! I tried a few without and then with maple syrup. They are quite tart! It's a bit of a pain to avoid the core but not THAT troublesome. I will probably be making some more (since the tree hasn't stopped) this weekend and have these ones with pork chops or something.

Tuesday, August 11, 2015

A Review: 40 Fundamentals of English Riding--Essential Lessons in Riding Right

I received this lovely book as part of a Christmas gift from +ADW's mum and I am so happy to have it! There are plenty of riding books out there and I'm sure there are many that are suitable to go through the technical theory of riding and provide some counsel about addressing errors (nothing beats getting an accredited coach/instructor for regular lessons, though). This book is logically put together to break down the various basics of riding--yes, it isn't just "that simple" and the contents provide insight into basic components for beginners/novices. While it focuses on the English style of riding, the basics are applicable to any discipline of rider especially at the beginner and novice levels.

Hollie McNeil is the author and is the head trainer at Riding Right Farm in South Cambridge, New York. Hollie holds a German Trainer's License and an International Trainer's License. Needless to say, she knows a thing or two about riding.

The layout of the book is bang on. Hollie starts with basic foundation stuff such as Control, Riding Position and Riding Aids. Then you move on to the Gaits in detail and to the German Training Scale. She rounds out the book with Key Riding Techniques, School Figures and Lateral Work. These last sections are very basic and give the reader a taste of what is available. While none of this is as complete as practicing and instructed lessons, it gives a breakdown of what to look for. For someone like me, I find it helpful to understand the technicality as well as the feel of things.

The breakdown of the information is short and concise, without fluff and the images are helpful to understanding what she's referring to. I like the no nonsense approach to getting the facts out there and the DVD further complements the content. I wouldn't say this would replace lessons or that a rider could learn every little thing about riding well, simply by reading this book but it gives good basics, is technical and short enough without losing the reader.

Despite all the positives, I'm not certain I'd go out to get this book for myself to learn in place of a coach/instructor. I do find it more fruitful to take lessons but appreciate the information being presented too; I might be more likely to consider borrowing this book from the library instead, if I didn't receive it. The title of the book is the objective of the author and she successfully achieves reviewing the 40 fundamentals of English Riding within 150 pages or so and DVD.

Monday, August 10, 2015

Lesson #196 & 197: Human Banana

I worked on the same things during the last two lessons in an effort to continue to improve.

Trot

I started with flat work in trot at sitting trot, with and without stirrups. I've been working on this so much lately that I have had actual progress. To add to the complexity of this section of the lesson, we ride in the outdoor arena which has a course set up so we weave in and out of the jumps with lots of bending and circles. One thing I notice is that I seem to have an uneven seat that causes Ariel to counter bend and drift out of the arena. Often by the time I realized it was happening, it is too late to correct it and I struggled with looking like I was drunk while riding.

I need to get my positioning right and my lower leg needs to move back a bit and I have to sit up more... like a human banana bent backwards and not forwards.

Canter

Cantering transitions continue to be difficult as I can't find consistency in striking off. Sometimes we speed up at the trot or absolutely nothing happens unless I'm holding a bat/crop. However, I want to do this all properly, without the need for artificial aids. I am reminded to drop my inside seat bone while sitting the trot (or walk) and sweeping my outside leg back while sitting up and back. This is more than a mess at this point but I'll be continuing to work on it in the next lessons.

Same here, my positioning is the one thing that is most affecting my poor communication to Ariel. More thoughts on the human banana.

Jumping

I'm not sure why but I've felt like jumping these last two lessons so I took a few tries. I went with a single jump for now since it's courses that throw me off... the first jump has been fine and then I become a discombobulated mess following leading to an increasingly messy course. I took whatever jump was set up that was on the quarter line and I wasn't intimidated at all. I still need work on the approach but the actual point where we take off and fly over has been fine. J tells me that I've been going over the 2'3" jump without any hesitation so that's good! It's a matter of refinement and consistency while going over. Hopefully it'll come together again and I"ll be jumping those courses again.

The ride in, should incorporate the human banana but a 2-point isn't so much a human banana...

Goals

My goals for riding include the 2'3" course with consistency and getting my fitness levels up because my biggest barrier is actually my physical limitations and not so much mental. Opening up my hips and getting my back strong again will help me get into that human banana shape much more easily.

Friday, August 7, 2015

Quick and Easy: Pizza

I have been shopping at the local farmers' market lately and I found this gluten-free round from Molly B. The suggestions include breakfast rounds and personal pizzas. I don't lead a gluten-free lifestyle (I love bread so much!) but I do try to avoid eating too much, so sometimes I'll get something "gluten-free", just to mix it up.

The instructions are SUPER easy and best of all, no defrosting needed.

  1. Pre-heat oven to 400-450F
  2. Put the frozen round on a cookie sheet
  3. Spread tomato/pizza sauce on each round
  4. Vegetables: I used, green peppers, red onions (lots!), garlic, tomato. You can add quite a bit if the round is not flimsy
  5. Fresh cracked pepper and oregano (or basil)
  6. Meat: 3-4 slices of spicy capicola, porcheta and sopresetta 
  7. Cheese: I had gotten sliced Finlandia Lappi cheese lying around so I used that


Pre-oven pizzas

Then I popped the whole she-bang into the oven for 10 minutes or until toppings are bubbly.

Finished product--'zza!!

The finished product was way better than I expected!! I will use more cheese next time and maybe even more toppings... I"m going to see what I should do, to "max it out" without falling apart :D

Wednesday, August 5, 2015

Riding In Iceland

I received an email from a reader about my trip to Iceland and how I handled the disinfecting of riding equipment. I realized when I was responding, that I never actually posted any resolution about how I did handle this aspect of my trip. So, to help other equestrians who are thinking about going to ride in Iceland, I have a summary of what I ended up doing and some details I encountered while I was doing the research.

Note: as I did run out of time during my research, I wouldn't say my summary is complete but this should be a good start for those looking; my information is also specific for equestrians so anglers or hunters or vets need to do more research.


Background

Iceland is an island nation that has its own population of horses, called the Icelandic Horse. Their horses are not vaccinated against any seriously infectious disease. As like any isolated country, their biosecurity measures are meant to protect all their flora and fauna. Anglers, hunters and equestrians alike need to take appropriate biosecurity measures to protect the ecosystem during their visit.

Researched Options

When I spoke with my small animal vet, she told me that vets generally travelling to different animal populations practice 2 weeks prior and 2 weeks post travel, to avoid any contact with animals, period. That is a very general practice and wouldn't hurt to employ, if you can. But, I was never asked to do this for my travels.

Travellers can approach this requirement by two options:
  1. Prepare prior to travel: riding clothes like pants and tops should be wet washed and dried (or dry cleaned) and then "rested" 5 days prior to going. Boots and half chaps can be washed and dried and then further disinfected with Virkon-S or a similar disinfectant (you can probably find this at most tack shops). Then you can get your veterinarian to write up a letter, sign and stamp it to certify that you have completed as needed.
  2. Address the requirement upon landing in Reykjavik: if you want to do things in Reykjavik, you'll want to stay longer than a few days. There is a service available at the airport called Icepark. They can do all that stuff for you (they also do this for anglers and others) but hold things for a few days before providing them back to you. I didn't go this route and didn't further investigate it but it sounds like it could prove to be logistically challenging.

Limitations

There are limitations about certain items that absolutely cannot be brought into the country... such as used riding gloves and any used horse tack. The reasoning behind this seems to be that there is a high chance that these items would come in contact with equine fluids such as saliva etc so were simply prohibited to tourists to bring.

Keep in mind though, that Icelandic horses have their style of tack and plus, it's probably not possible to know the size of your mount. Gloves on the other hand are not terribly expensive so it likely isn't a major issue to get new ones for your trip.

What I ended up doing...

I didn't end up getting the veterinary certification that was referred to me because I ran out of time. I did have correspondence with a representative from MAST, the Icelandic Food & Veterinary Authority, as well as my small animal veterinarian. Because my trip was not solely focused on riding and I wasn't staying a long time (over a week), I did as simply as possible. I washed my riding clothes (as directed) such as tops and bottoms and then bought new gloves (I didn't have winter gloves anyway), and used the rest of their equipment when I got there.

Because of the amount of stuff to bring and the coordination that would be involved, I didn't think that doing more was worth my time. However, if your trip is more horsey focused or longer, you might feel otherwise.

Resources

Check out the MAST website (English version) and contact them to get more information. They are helpful but you'll want to do it well ahead of time so you don't run out, if you need more extensive information.

Bonus Tip

I found taking photos or videos was easiest with a mounted camera such as a GO Pro to keep your hands free during the ride.

Tuesday, August 4, 2015

Lesson #193, 194 & 195: Dogged Determination

There hasn't been a lot to report on, in the last couple of weeks. That, and I spent an afternoon in the local ER due to a health related concern that I don't have answers to, quite yet. I'm not the type to worry until I know what there is to worry about... we'll know when I demand some tests from my regular doctor. In addition, whatever it was took me out for a week and I'm still having some difficulties being 100%.

But enough about the boring stuff that remains a mystery and out of my control; let's talk about the last 3 lessons! We focused on flat work. I hadn't been feeling up to any jumping and I wanted to gain some mastery with the sitting trot rather than continue to bounce around on top of Ariel. So away I went... lesson after lesson doing nothing other than sitting trot.

J pointed out that he knew when I was doing it wrong (that is, absorbing the motion incorrectly) when the pony tail hanging down my back was bouncing along with me. He reminded me to sit back (which feels like I'm leaning right back) and to absorb with my hips and abs. Apparently it's a momentary "on/off" contraction of muscles; as solid contraction or lack thereof would result in the incorrect motion. So around and around I went... with and without stirrups. Sometimes it was successful and other times (often) it wasn't. I also got into some canter just to keep things interesting and I practiced the dreaded figure 8 exercise that would have the transition of the lead at the centre of the figure. I determined to do the simple change since that was what I was struggling with in the past. I would say things were getting better since I was able to accomplish that when I asked (and when I was late, Ariel did the autochange for us). I also mustered the courage to canter without stirrups since several lessons ago, Sheri asked me to do it but I totally chickened out. I did it!! It started out as me losing my stirrup and going around without them. I came back down just fine so figured, this might mean I can do it without, period! It is tricky though... because it's easy to grip with your knees and curl forward because the horse is speeding up or you're getting nervous.

One of the things I did struggle with remains the smooth and consistent canter transitions as well as my own twisty body. Transitions remain tricky as I tend to lean forward when asking and thus putting Ariel on the forehand. I also wanted to get the transitions without the need for artificial aids like the bat/crop. Like most horses, Ariel sped up when her rider is holding one but I that meant that i was doing something wrong when she would speed up the trot or simply ignore me. I spent my lessons determined not to use them until I was pretty beat fighting with the mare. My twisty body added to the complications and I would torque outwards and so Ariel was doing the same counter bend. Actively telling myself to open up my chest and keeping my shoulders down and back was really challenging since all the other stuff needed my attention too.

During the last lesson, +ADW and I swapped things up again and I hopped on Molson while he practiced his sitting trot on Ariel (apparently the easier of the two). J teased me and said that if we were to do that, I'd need to jump on Molson. I felt more myself and confidently accepted the challenge. We didn't do anything exciting since anyone jumping with the "King of the Long Spot" usually would crap their paints after riding a horse like Ariel. Molson and I went off just fine even though he did his usual power up 3 strides into the jump and I did my usual "omg I'm going to die". We didn't do half bad considering I was crapping my pants up there but I needed to give him more of a release. Yea right. Give more release to a horse that tends to drop his front end. The trick to try? Place both my hands on his neck as we are coming into the jump to give him the release and to get my into the right position over. Worked like a charm! If you can maintain the courage not to pull back and just go with it.

So while it wasn't back with me jumping the 2'3" course, I did pull myself together enough to progress with the sitting trot and got over the fear of riding jumps with the Molson.